A couple of years ago I found a Pinterest post or two
that said you could make doll tights
from a pair of sox.
Wow, great idea!
Except that every tutorial I found left me pondering.
What were the measurements that worked?
What size sox were these?
Could I use sox that didn’t seem to stretch much?

Last year, I decided to experiment,
make several pair and
refine my method.
It all worked out so well
I decided to share a tutorial with my online friends.
It’s time to share it with all of you!
You can download the tutorial here:
Save and/or print your own copy.
Or, just read along here and make notes:

Making Tights from Socks
A tutorial for standard 18” dolls from
Janie Carroll Designs
Following are instructions, measurements and tips I’ve adapted for making doll tights from adult size knee-high socks. Enjoy!
Supplies:
1 adult size (9-11) knee-high sock; must be rather stretchy!
‘Stretch’ or ‘Jersey’ sewing machine needle
Standard sewing machine thread
Optional: ¾” scrap of ‘Seams Great’ or bias tape
This tutorial is provided by Janie Carroll Designs. You may not sell it, publish it, or share it without permission. You may sell items you make!
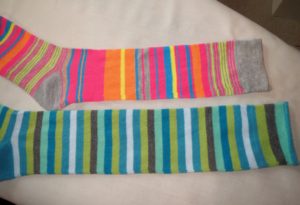 Notes on choosing socks: Adult size (9-11) knee-high socks are not created equal! I found quite a variance in lengths and stretch. The green/aqua stripe shown is far longer than the multi-color sock. If the sock does not seem stretchy it really will not work for doll tights. I don’t have any percentage guides here; test several socks for comparison and avoid those that cause doubt!
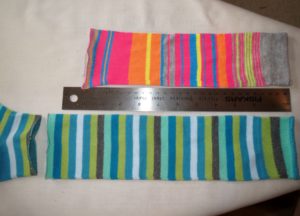 Cutting off the foot: Because the multi-color sock was so much shorter I cut the sock right at the heel juncture. If you’re using a striped sock you’ll want to take care that you are cutting on the same stripe all around. Note that the multi-stripe cut tube is now about 11” from the finished top edge to the lower cut edge. This is the absolute minimal length that will work for tights. I cut the green/aqua sock at 12 and ½” inches and this worked well, too. If you have the length available I would recommend the 12 and ½” length.
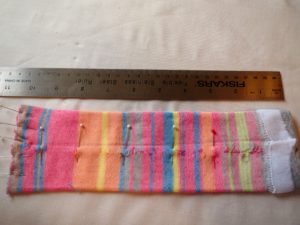 Turn the sock tube wrong side out. Position the lengthwise seam down the center; it may look like a row of raveled threads. Pin across the cut edge, taking care that the edges are flat.
 Marking Crotch point: Here’s that same photo again, let’s note more details. The finished top band of the sock will become the waistband of our doll tights. Place a pin 3” down from the finished top band; this pin is the crotch point. (if your cut length was 12 and ½” you may place your crotch pin 3 and ½” from the finished top band) Note the extra pins down the sock? Place these to match stripes, flipping the sock over to check. These pins will also prevent shifting during stitching.
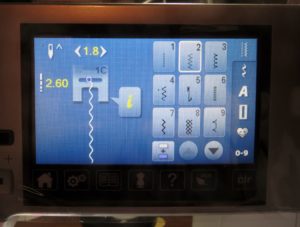 Select stitch and needle: Select a fairly narrow, medium width zigzag stitch on your machine. Use a ‘jersey’ or ‘stretch’ needle to prevent popped stitches & runs.
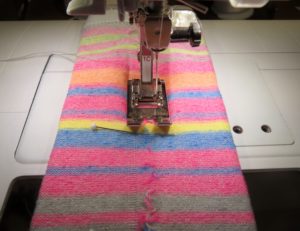 Stitching the leg seams: Beginning at the crotch point, with the cut end facing you, stitch down the right side of the center seam, just 1/8” from center.
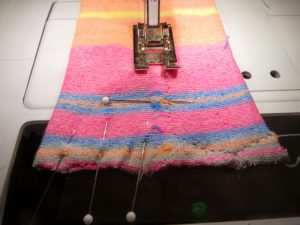 Forming the toe seam: About ½” from the cut end begin to curve your stitching towards the outer fold of the sock. Continue the curve down a bit and then back up. Don’t obsess over perfection here; the tights will be stretchy and her foot will be hidden in her shoes.
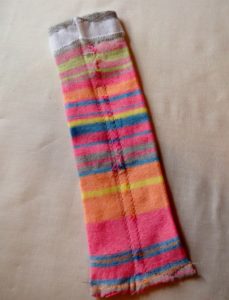 Sew the second leg seam: Begin at the crotch pin. I like to form the (very short) crotch seam now. Stitch from your first leg seam, across ¼” to the point where your second leg seam will begin. With the needle down, pivot and begin sewing down the second leg seam. This seam should be about 1/4” from the first seam; meaning that the original seam of the sock should be exactly centered between your two leg seams. Study the picture & curve the toe seam just as you did on the first leg.
 Optional, add stay tape to crotch: Because the crotch is a stress point, I like to reinforce it. Cut a ¾” scrap of bias tricot ‘Seams Great’ or a length of bias tape. Pin this over your tiny crotch seam. Sew over your original stitching.
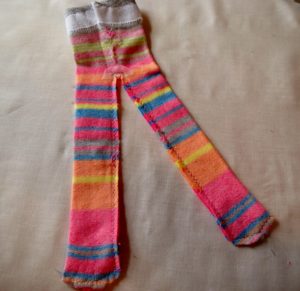 Final cutting: Carefully cut straight up the center, between the leg seams. Stop ¼” from the crotch seam and make tiny clips into the corners, as shown. Take care that you do not cut the stitching. Trim excess bias tape and round off the corner seams at the curved toe ends.
 Try them on: Turn tights right side out and place both feet into the legs. Working slowly, NO TUGGING!, smooth feet into place. Toe seam will be right across the end of the dolls toes, and the leg seam should run straight up the inside of the leg. The fit of the tights will vary, depending on the length and the amount of stretch available. The multi-color tights fit snugly while the green/aqua pair were more generous. I would not recommend very snug tights for younger girls.


Enjoy making cute and cozy tights for your favorite dolls!

I am sure to use this. Very easy to understand. Thank you Jane.
5 Stars
Thank you for this tutorial. It is so nice to have someone else work out all the bugs before I start to sew!
That was exactly my plan – work out the bugs! lol.
Such and wonderful and detailed tutorial! Now I’ll be on the look out for socks to turn into tights! Thanks Janie!
I recently experimented with this idea myself. Now that knee socks come in mismatched packs, you can get quite a variety for your money. I wanted to make a pair of leggings for a mid-century ballerina doll, and I found new pairs of trouser socks at Goodwill. I was afraid they might run, but they didn’t. I think they’re very pretty on that doll.
Love the way you reinforced the seam!
Thanks SO much for such a clear tutorial. I think I will be able to handle this helpful pattern. Glenna /grams
You’re very welcome! I hope you give it a try!