We all love to pursue new pattern listings, whether in the ‘big books’ at the fabric store or scrolling through a favorite website page or etsy shop. Sometimes the pattern photos seem so perfect that
we buy the pattern – along with the supplies to copy it exactly!
Other times the pattern photos are a complete turn-off. Perhaps it appears that the garment doesn’t fit well. Maybe the sleeves seem skimpy, the skirt length looks dumpy or the whole thing looks like the outfit is 2 sizes too large.
So we leave that pattern behind and move on!
Good news! You’ve got a lot more choices than ‘take it’ or ‘leave it’. There might just be good things waiting to happen behind those ho-hum sample photos. Learning to really look at a pattern and it’s ‘bones’ is a skill you can develop easily. I was not born with a creative soul.
Seriously, I was a color-inside-the-lines sort of girl
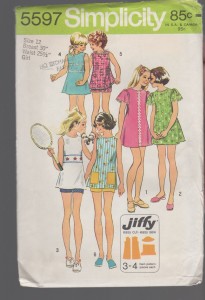
Remember that Singer sewing class I told you about? The one I took when I was 10? Here’s a picture of the pattern that I picked out in class to make. I was so excited when Mom came to pick me up so we could buy my supplies! I wanted the classic tennis set with white pique for the tennis dress and blue for the shorts, of course, with the cute little stars and trim for the waistline. None of the other views were half as appealing to me. Never mind that I did not have the least interest in tennis!
My mother had other ideas
In 1973, Mom didn’t much care for my opinion. She said white would get dingy and was impractical. She and the instructor picked out some fabric for me, along with packages of green rick rack and this is the outfit I actually made. This is my lovely daughter, Sharon Jane, at age 10, modeling it.
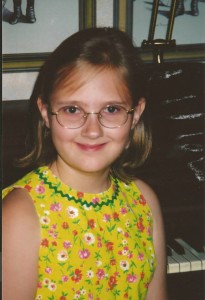
In the end, I loved this yellow floral version, with the green rick-rack trim. I wore it quite a lot and was thrilled when Sharon was able to wear it, too! It never did get dingy and it still looks great! It was a valuable first lesson in thinking outside the box. I actually won an Honorable Mention award for my outfit and my mother said that part of the reason was because my outfit was NOT a copy of the pattern envelope. (Sorry to say, I cannot find any pictures of me in this outfit!)
Which brings me back to those patterns that we tend to by pass in the catalogs. How about this one?
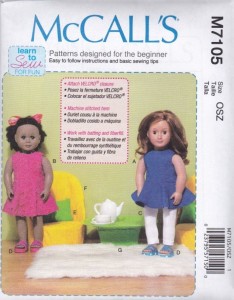
Let’s face it, this envelope photo isn’t terribly exciting. The garments look rather dowdy to me. There is nothing really wrong with it, it’s just sort of ..unappealing.
How do we learn to see past a photo like this to what is really being offered?
My mother had a maddening habit of turning a pattern over before I’d even had time to admire the front! She said the important stuff was on the back, and she was definitely right, even though I hated to admit it. A few years ago, the envelope back always included line drawings of the garments and sometimes there were even drawings of the main pattern pieces themselves! Today, I find myself pulling the instructions out of the envelope to find these drawings but they are still available. (and, yes, you can take those out before you buy! I’ve done it hundreds of times. Just make sure you are careful and get everything back in the envelope neatly!)
Examine the drawings of this particular pattern and what you’ll find is a basic lined, sleeveless bodice and a full circle skirt in two lengths. The front photo garment appear to fit ok, too, no gaping armholes or over-sized fit. Just because they chose fabrics that had little pizazz doesn’t mean you have to do the same! and here’s another tip:
Basic garments make the best canvas for adding details
and I thought this one had vague possibilities. I stashed it away and nearly forgot about it. Even when you know better, a poor envelope photo is NOT inspiring! Then one day I saw a picture on Pinterest of a little girls outfit. I can’t link it for you, as it’s no longer listed as available but it was a brown jumper with a full gathered skirt, candy striped waistband, oversized buttons and jumbo rickrack trim. A gingerbread girl! I was in a holiday mood and the outfit was so cute I decided I had to make one! I immediately remembered some pinwale brown corduroy I had in just the right shade, and I went in search of a suitable pattern. Here’s what I made, using the pattern shown above:

My garment is not identical to the original outfit, but the inspiration of that dress gave me a springboard from which to jump to my own ideas. I cut out the brown corduroy, but…
I still didn’t have definite ideas for my trims
and
I like to build designs one element at a time
I suggest you begin with what you have on hand first. I went in search of my button boxes. I came up with 3 good possibilities: red hearts, white snowflakes and these small green round buttons. Truthfully, the green were the least interesting. They were plain…and…round. I set them aside.
Next I hunted through my ribbons and found this gorgeous red/white polka dot grosgrain. Well:
Jane likes red!
So the polka dot ribbon was selected, and that choice immediately eliminated the red heart buttons. Too much red would be redundant. Had I chosen to use both, both would have less impact individually and together they would seem like too. much. red. Even to me.
I believe the white snowflakes could have been cute but by now I had the vision for a red/white/green color scheme. The icing ‘needed’ to be white. Of course I had a full box of rick rack choices but no white in a standard size. That white rick rack meant a trip to the fabric store, but, that’s another good point:
Don’t let a ‘use what you have’ mentality become a liability!
I don’t even want to think about how many photos of beautiful garments I’ve seen ruined by a poorly chosen trim or buttons in a color that didn’t really ‘go’ because someone had it in their stash.
Start from where you are but don’t short-change your vision!
With the addition of the red polka dot ribbon and the white rick rack, the simple green buttons were absolute perfection. Which is another lesson:
Every individual element does not have to have a WOW factor
A true WOW factor is a collective effort. Imagine a movie with only a leading man and no supporting roles or character actors. The lesser parts can be just as important to the final product as the shining stars. Like my simple, round, green buttons. The end result is worth admiring!

Once I’d seen how great this particular pattern really was? I wanted to make it again! It stitches up quickly and easily and it fits current American Girl brand dolls really well!
I decided to take my second garment in a completely different direction. I won’t go through the complete design step process again but here is one other idea for thought:
Start from a different beginning point to end up somewhere new
The outfit above began with a photo and a ‘costume’ idea. By just thinking about the basic bodice and the flirty circle skirt I suddenly envisioned a party dress and I wanted to use a silk flower I had purchased over a year prior. So, beginning with only the pattern and a fuchsia flower, here’s where I ended up:
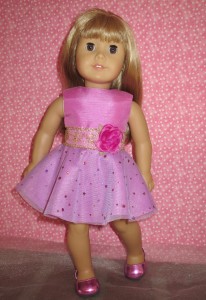
My favorite details here are the gold lace trim and that silk rosette at the waistband. I also love how the lavender mesh overlay gave a subtle color change to the orchid shantung fabric.
Use this post as a ‘pattern’ of sorts – no pun intended!
What might new starting points look like?
The type of event requiring clothing
A fabric or trim piece you’ve been waiting to use
An embroidery design you’d like to showcase
In the end, neither of my finished garments look a thing like the original pattern envelope.
And that’s just how my Mama taught me!

Wow that was strange. I just wrote an extremely long comment but after I clicked submit my comment didn’t appear. Grrrr… well I’m not writing all that over again. Anyway, just wanted to say fantastic blog!